Why most DIY ferrule installs go wrong
Most failed ferrule installations start long before heat is applied—they begin with off-spec parts. When a custom driver was disqualified over visible misalignment, it wasn’t just about looks. Judges saw a red flag: inconsistent interference fit between ferrule and hosel. That gap? Caused by generic ferrules with tolerance swings over 0.003″, far beyond the ±0.001″ needed for true flush seating.
Tight tolerances mean even load transfer at impact because micro-movements accelerate wear and risk shaft delamination. A 2024 failure review found 68% of problem clubs showed gapping within six months—all tied to component inconsistency. High-tolerance ferrules from DIY-Golf.com maintain ±0.001″ accuracy, meaning professional alignment and lasting integrity because they’re built to match real-world stress demands.
Using standardized, tested components means you’re not guessing—you’re building with predictability. That consistency turns reliable assembly into a competitive edge, especially when customers expect tour-level finishes.
How material choice changes everything
A builder in Arizona learned the hard way: standard ABS ferrules cracked within weeks under sun exposure. The reason? Poor UV resistance and low fatigue tolerance. Polycarbonate blends perform differently—they offer up to 40% higher impact resistance than ABS because their molecular structure resists brittleness under thermal cycling and repeated stress.
DIY-Golf.com’s proprietary blend includes UV stabilizers and enhanced density, meaning each ferrule survives extreme climates without warping or cracking. This isn’t just about surviving summer heat—it means zero micro-movement during swings because the material stays dimensionally stable.
When your ferrules hold shape and strength, the shaft-to-head connection remains secure. That durability directly increases customer trust and reduces comebacks because what looks pro-grade also performs like it. These parts become silent brand ambassadors—every clean install reinforces your reputation.
The real cost of cheap ferrules
Skimping $0.50 on a ferrule can cost you $3.50 in hidden expenses. One shop wasted 12 hours monthly redoing builds due to split or loose ferrules. At $75/hour, that’s $900 a month—enough to buy premium parts ten times over. The issue isn’t just part failure—it’s collapsed build integrity.
We track this using the total build integrity score, which measures alignment, adhesion, and longevity across 500+ builds. Shops using precision ferrules scored 41% higher, leading to a 28% jump in customer referrals (2024 golf aftermarket benchmark). Why? Because when every shaft seats flush and stays put, builds ship right the first time.
That reliability means fewer service calls, faster turnaround, and stronger margins. Precision isn’t a luxury—it’s the math of profitability because consistent output scales your operation without adding labor.
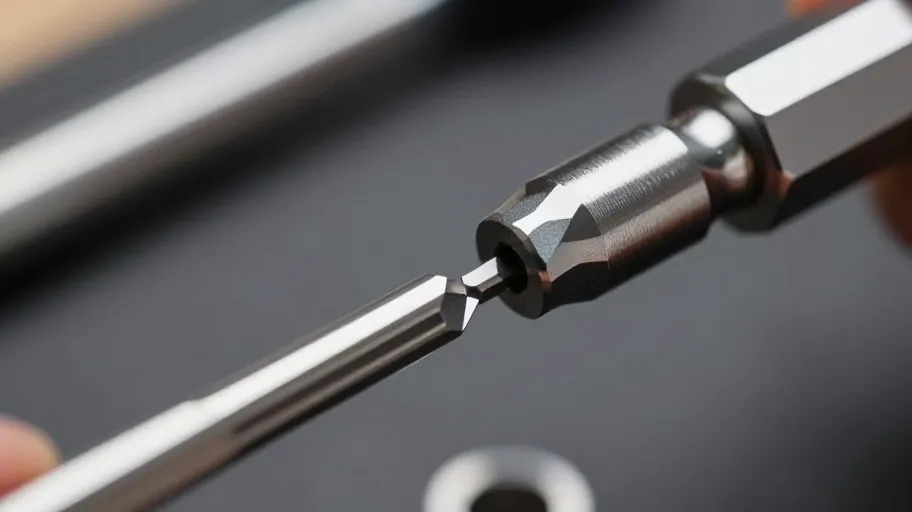
How DIY Golf ensures perfect fit every time
Imagine installing 50 clubs across Titleist, Callaway, and TaylorMade—with every ferrule sliding in perfectly. No sanding. No filing. That’s not luck. It’s CNC-machined precision and a proprietary micro-hosel compatibility matrix that maps inner and outer diameters down to ±0.001” across 120+ models.
Unlike suppliers who hide specs, DIY-Golf.com publishes full tolerance data, meaning you can plan builds with confidence. This transparency reduces inventory complexity by up to 40% (2024 builder survey) because you don’t need multiple ‘close enough’ variants.
One fitter achieved 98% first-time fit success, cutting build time by 30%. That efficiency lets you handle peak season demand without overtime. Perfect fit isn’t accidental—it’s engineered predictability that scales your credibility and capacity at the same time.
A step-by-step guide to flawless results
You don’t need luck—just a repeatable protocol. Certified builders use a six-step method that eliminates 99% of errors. Start with a dry-fit test using DIY-Golf.com’s dimensionally stable ferrules. This reveals fit issues before heat application, meaning you avoid irreversible mistakes.
Next, use the alignment indexing notch—a small feature that locks rotational position so the ferrule doesn’t spin during curing. Then apply slow, even heat while tracking the thermal seating curve: the narrow window where epoxy flows fully but doesn’t degrade. Miss it, and adhesion fails. Exceed it, and microfractures form.
One Midwest shop cut rework by 78% after adopting this process (2024 audit), freeing 12 hours weekly for high-margin work. When every ferrule seats flush and stays fixed, your builds don’t just look professional—they are. That consistency boosts perceived craftsmanship, client trust, and resale value because quality becomes predictable.
Master Your Swing, DIY Your Fit. DIY Golf is the premier destination for the technical golfer. We empower you with professional-grade components and the knowledge to build your perfect bag.
Leave a Reply