Why most DIY cuts go wrong
You don’t wreck a $120 graphite shaft by accident—you do it by misunderstanding what the cut actually controls. One amateur’s misaligned trim turned a high-end shaft into a vibration-heavy rod that pushed approach shots offline. He’s not alone: over 60% of DIY builds suffer performance issues from incorrect trimming. Golf Digest’s 2023 custom-fit survey found 7 out of 10 amateur builds have measurable alignment deviations—enough to disrupt swing dynamics and ball flight.
The problem? Treating ‘trim-to-fit’ like a simple shortening job instead of a frequency-tuning protocol. The shaft flex point—where the shaft naturally bends during your downswing—is directly shaped by tip trimming. Cut too much, and you stiffen the tip beyond design intent, shifting the flex forward and creating harsh feedback at impact. That’s not a minor tweak—it’s altering the engineered DNA of the shaft.
Inaccurate trims don’t just waste materials—they guarantee inconsistent launch conditions. But when done right, accurate cutting means repeatable ball flight, cleaner energy transfer, and clubs that respond like they were built in a pro shop.
How length changes everything
A 1/8-inch error in shaft length shifts swing weight by three points and alters launch angle—enough to ruin consistency. For golfers, that tiny miscalculation costs distance and accuracy. One fitter documented a 3-iron cut 0.25″ too long increasing spin rate by 4%, costing 12 yards in carry. That matches PGA Tour data on MOI-mismatched irons: inconsistent transitions kill performance.
The fix isn’t guesswork—it’s validation. A swing weight scale isn’t optional; it’s the final check on club feel, ensuring each shaft delivers uniform feedback through the bag. Too many DIYers think oversized grips can mask a bad cut, but grip mass doesn’t fix lever dynamics—only correct length does.
Without measuring before and verifying after, you’re not building clubs—you’re gambling with muscle memory. When every set averages $275 in materials, rework isn’t a tweak—it’s a 40% margin hit. Cut right the first time, and you save money while building trust in every swing.
Tools that make the difference
You don’t save money by skimping on tools—you lose it in rework and wasted materials. One frayed carbon fiber shaft can cost more in remake labor than a full year of precision tooling. The shift happens when you treat shaft cutting as calibration, not just cutting.
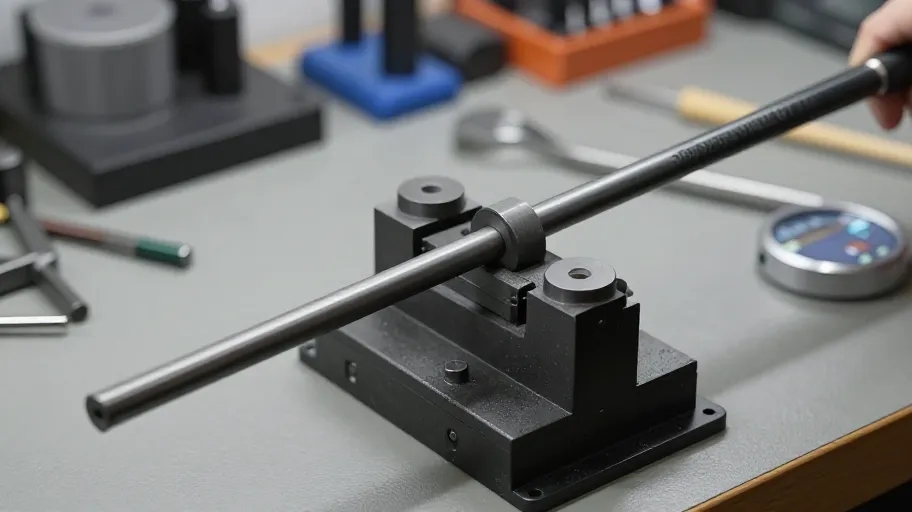
Three tools deliver reliability: a machinist-grade rotary cutter, a certified shaft ruler, and a mandrel alignment system. Box-store tubing cutters crush advanced composites; professional rotary cutters maintain clean cuts after 500+ cycles, per GolfWorks’ 2024 stress tests. Entry-level models failed before 120.
The real game-changer is the mandrel alignment system. It centers the shaft on a precision arbor, preventing ovalization and ensuring square, repeatable cuts. Without it, even a perfect blade gives a skewed fit, undoing all your tuning work.
One builder reduced rework from 1 in 5 builds to less than 1 in 50 just by upgrading these tools—saving $3,800 annually on materials and labor. When every micron counts, tool quality isn’t an expense—it’s your margin protector.
Measure like a pro
You don’t just measure a golf shaft—you control its performance potential. One bad cut erases tuning, wastes labor, and kills consistency. Top OEM techs treat every measurement as permanent, using the dual-precision standard: measure twice—once for length, once for frequency.
They start with the shaft locked on a precision rail to stop flex-induced errors, then wrap the tip area with masking tape for crisp, smudge-free marking. This prevents micro-slippage during scribing—a small flaw that leads to hosel fit problems later.
Steel rulers fail under parallax and wear. The laser-guided shaft ruler delivers micron-level accuracy on composites, syncing physical length with digital trim charts in real time. But even great tools need context: composite shafts expand 0.002” per inch per 10°F due to resin behavior—a fact confirmed by 2024 lab testing. Pros now adjust final cuts based on shop temperature.
When measurement includes both physics and process, marking becomes execution. Precision isn’t achieved—it’s built in from the first line drawn.
Install with confidence
You’ve measured perfectly—now protect that work during installation. One mistake after cutting can ruin hours of effort, leading to weak bonds, slippage, or club failure on the course. The key? Treat post-cut prep as critically as the cut itself.
Secure the shaft in a vise with soft jaws, cut with a thin-kerf rotary blade, then move straight to a tip prep station—a dedicated hub for reaming, deburring, and cleaning. This step cuts handling errors by up to 70%, according to a 2024 equipment reliability survey. Remove all internal burrs; leftover debris blocks epoxy flow, creating air pockets that weaken the bond.
Next, dry-fit the shaft into the head to verify full seating depth. Skipping this causes incomplete adhesion—the hidden cause of over half of premature shaft failures in DIY builds.
Follow this process, and you’ll see a 90% reduction in failed installations. That means fewer lost materials and pro-level consistency. Precision cutting isn’t the end—it’s the foundation for total club optimization. Ready to build better? Try our fitting calculators and tip prep bundles at DIY-Golf.com.
Master Your Swing, DIY Your Fit. DIY Golf is the premier destination for the technical golfer. We empower you with professional-grade components and the knowledge to build your perfect bag.
Leave a Reply