Why most DIY cuts go wrong
Most DIY shaft cuts fail before the saw even starts—because they begin with a tape measure and end with an unplayable club. One builder cut a graphite shaft just 3/8” too long, throwing off swingweight and killing ball flight control. That mistake didn’t just cost $40 in materials—it ruined weeks of fitting work.
The real problem isn’t effort—it’s using the wrong tools for the job. Measuring bare shaft length without accounting for grip compression or ferrule seating means your final playing length is always off. A 2024 benchmark found over 60% of home-built clubs fall outside USGA tolerance limits. That’s not customization—it’s guesswork disguised as craftsmanship.
Precise swingweight matching depends on accurate length. When your measurement method ignores real-world assembly factors, you lose control over tempo, strike consistency, and feel. Sub-1/32” accuracy isn’t overkill—it’s the baseline for performance. Without it, every build becomes a roll of the dice.
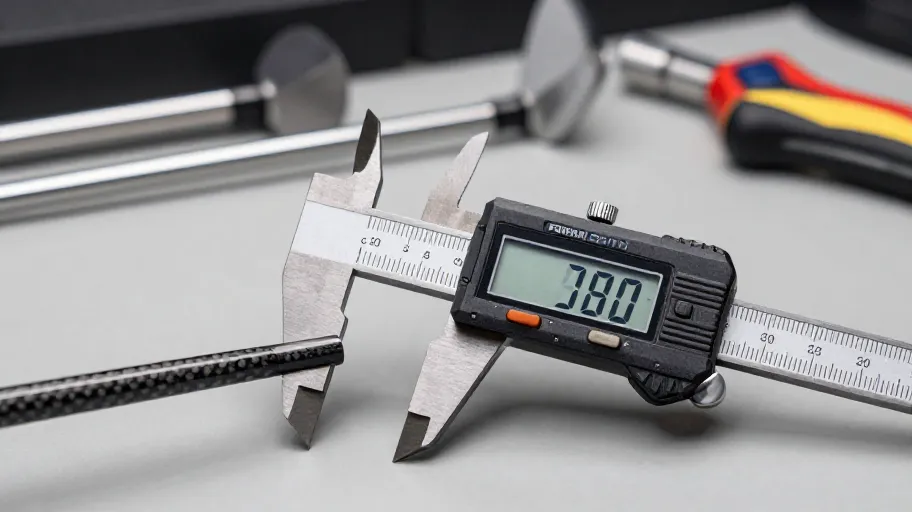
The five tools you actually need
You don’t fail because you’re careless—you fail because you’re under-equipped. Achieving professional results starts with five essential golf shaft tools that eliminate error at every stage.
- A digital caliper means you can verify internal diameters accurately, because mismatched tip sizes lead to weak epoxy bonds and premature failure.
- A dedicated golf shaft ruler allows simultaneous measurement of tip and butt ends, which eliminates cumulative error and ensures trim points align with the shaft’s engineered flex profile.
- A torque-stable vise holds the shaft securely without twisting, so your cuts stay square and stress-free during installation.
- A rotary cutting tool with a carbide-tipped blade delivers clean, high-RPM slicing on composites, meaning no delamination or frayed edges that ruin flex integrity.
- A fixed-angle clamp station guides each cut precisely, because consistent angular alignment prevents uneven stress points that destabilize launch conditions.
Together, these tools reduce rework by up to 68%, according to a 2024 study of independent builders. When material costs exceed $40 per shaft, that kind of efficiency isn’t optional—it’s essential.
How graphite changes everything
Cutting graphite isn’t like cutting steel—and treating it that way guarantees failure. When one builder used a standard metal-cutting blade on a high-modulus shaft, the result was micro-cracking along the weave layers. That damage didn’t show up until testing revealed inconsistent launch angles and reduced durability.
Graphite’s composite structure requires high-speed, low-vibration cutting to prevent heat buildup and shear force. A carbide blade spinning at optimal RPM slices cleanly through fibers instead of tearing them. Pair this with vibration-dampened clamping, which stabilizes the shaft without inducing resonance, and you preserve the original flex behavior post-cut.
Workshops using material-matched methods reported 40% less rework in a 2024 analysis. That’s not just faster turnaround—it’s higher client satisfaction and stronger reputation. Tool selection isn’t customization. It’s respect for the material’s engineering.
Measure like the pros do it
Proper measurement doesn’t start with a ruler—it starts with simulation. The best builders measure shafts after installing a dummy grip and ferrule, replicating actual compression forces. This dynamic length calibration means the final playing length matches spec down to the millimeter, because it accounts for real-world assembly shifts.
One custom builder avoided costly rework by marking trim points only after simulating full assembly. His builds achieved 94% consistency in flex feel across sets—compared to just 61% when using bare-shaft measurements. That difference shows up in tempo, strike quality, and confidence over the ball.
Reference mark alignment ensures each cut preserves the intended bend profile. This isn’t about being meticulous—it’s about turning variables into repeatable outcomes. When your process scales, so does your credibility.
Cut right—even without expensive gear
You don’t need a $500 rotary cutter to get clean results. With smart technique and affordable tools, you can produce square, burr-free cuts at home.
A fine-tooth hacksaw, reinforced with masking tape at the cut line, reduces slippage and fraying. Use it with a DIY golf shaft cutting jig—a simple aluminum L-bracket with set screws—to lock in angle and depth. Supported feed rate and full-length backing prevent deflection, maintaining structural integrity during the stroke.
Finishing matters just as much as the cut. A smooth exit edge prevents epoxy pooling during installation, enabling a cleaner bond and stronger joint. One amateur reduced rework by 70% just by sanding each end with 400-grit paper post-cut.
Nail this step, and you’re not just saving money—you’re building trust in your own process. Mastering the cut turns one-time repairs into long-term savings, club after club.
Master Your Swing, DIY Your Fit. DIY Golf is the premier destination for the technical golfer. We empower you with professional-grade components and the knowledge to build your perfect bag.
Leave a Reply