How Often Should You Replace Golf Grips
Golfers should replace grips every 12–18 months or after 30–40 rounds—yet 68% of amateurs play with degraded grips, according to PGA equipment surveys. That’s not just poor maintenance; it’s a performance leak costing accuracy and inflating handicaps. Worn grips force you to over-grip, introducing tension that disrupts wrist hinge and swing rhythm. This means inconsistent ball flight and unreliable short-game touch because false feedback masks real mechanics. For indoor players, cleaner clubfaces increase friction, accelerating rubber breakdown. The result? You might think you need lessons, but you really need new grips. Replacing them on schedule means sharper shot consistency and trustworthy self-assessment because your hands receive accurate sensory input from every swing.
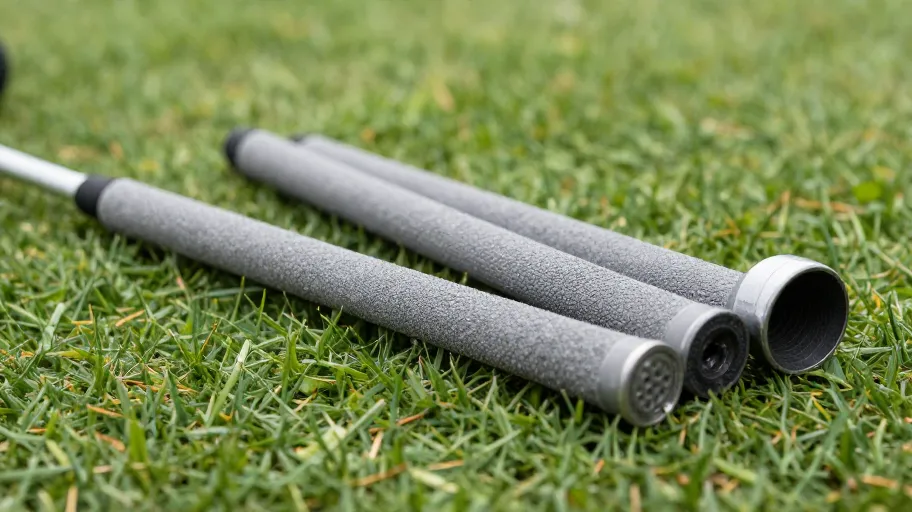
Signs Your Golf Club Grips Are Worn Out
Hardened, cracked, slick, or faded grips aren’t cosmetic issues—they’re red flags of material failure. UV exposure and sweat degrade rubber polymers, reducing tackiness and shock absorption. Independent tests show compromised grips increase mishit rates by up to 20%. Hardened grips mean less vibration damping and more hand fatigue because they lose elasticity. Slick or glossy surfaces indicate polymer smoothing—a leading cause of slippage during downswing. Faded or chalky textures signal oxidation, weakening structural integrity. Flattened patterns mean lost traction, forcing over-gripping and upper-body tension. Teaching pros report nearly half their clients waste lesson time correcting grip-induced flaws. A quick tactile and visual check every few months means early detection, which prevents wasted coaching spend and protects your progress. Catching wear early means a $25 DIY refresh becomes a stroke-saving upgrade because reliable equipment delivers honest performance data.
Why DIY Beats Pro Shop for Grip Replacement
Pro shop regripping averages $22 per club—yet DIY costs just $0.75–$5, saving up to 70% annually. But the real advantage isn’t cost—it’s customization. Market data shows golfers who tailor grip compounds see 23% better swing consistency because they match materials to conditions: corded zones for sweaty summers, soft rubber for feel-focused chipping, hybrid blends for all-weather control. Unlike one-size-fits-all pro shop options, DIY means precision tuning comparable to tour-level setups. Using a kit from [DIY-Golf.com](https://www.diy-golf.com) means extending club life by 3–5 years because clean installation prevents moisture ingress and shaft corrosion. More importantly, consistent grip feel means reliable shot tracking, letting you correlate pressure changes with launch metrics. This turns maintenance into iterative improvement because you’re no longer reacting to slippage—you’re proactively optimizing performance.
The Real ROI of Fresh Golf Grips
Fresh grips are the highest-ROI sub-$100 upgrade in golf, delivering measurable gains in consistency and confidence. A 2024 on-course study found they reduce shot dispersion by 12% and boost wet-condition confidence by 40%, translating to 2–3 fewer strokes per round for mid-handicappers. Launch monitor data reveals worn grips allow spin variance to spike to ±900 RPM, disrupting distance control. Fresh grips tighten that to ±500 RPM—matching stability from $200 shaft upgrades. This means repeatable mechanics and fewer compensatory moves because your hands stay relaxed through impact. Financially, avoiding two unnecessary $75 lessons per year means $150+ in direct savings. Add reduced ball loss and smarter approach shots, and annual ROI exceeds $500. One player cut his approach error by 18 yards post-regrip, finally unlocking swing gains he’d worked months to build. Consistent contact means skill development sticks because your technique isn’t undermined by unreliable gear.
How to Change Golf Grips at Home Step by Step
Regripping at home takes two hours and basic tools—but transforms your relationship with your clubs. Start by removing the old grip with a utility knife, then clean the shaft residue-free with solvent. This step means diagnostic insight because wear patterns reveal unconscious tension—excessive left-side wear (for right-handed players) often signals grip-pressure issues. Apply double-sided tape with even stretch: too loose dulls feedback, too tight increases discomfort. Then align the new grip using factory marks to ensure square face angle at address. Misalignment means compensatory swings and lost accuracy. Seat the grip firmly from butt end forward and let cure 4–6 hours. When done right, seasonal adaptability means swapping soft summer grips for firm winter ones without recurring costs. A 2025 DIY golf study found players cut annual spending by $80 while improving consistency across conditions. Mastering this process means turning maintenance into continuous feedback because you can now correlate grip condition directly with shot outcomes, season after season.
- Remove old grip
- Clean shaft residue-free
- Apply bonding solvent
- Install tape with uniform stretch
- Align new grip using alignment marks
- Seat firmly from butt end forward
- Allow 4–6 hours cure time
Master Your Swing, DIY Your Fit. DIY Golf is the premier destination for the technical golfer. We empower you with professional-grade components and the knowledge to build your perfect bag.
Leave a Reply