Why Golfers Keep Wasting Money on Pro Installations
You’re paying up to $250 for a service you can do once and own forever. Most players spend $20–$50 every time they switch shafts—a recurring cost with zero long-term return. With 68% of club upgrades involving new shafts (Golf Digest, 2024), this adds up fast. Fewer than 12% try DIY, not because it’s hard, but because they don’t know modern tools make it simple.
A full kit—precision heat gun, shaft puller, alignment jig—costs under $100. That’s less than three pro jobs. After that, each swap takes 30 minutes and costs nothing. This turns DIY golf shaft installation from an expense into an investment. You’re not just saving—you’re taking ownership of your setup.
How Modern Components Make Precision Fitting Accessible
Pro-level fitting no longer requires a six-figure machine. Modular golf club fitting components now deliver 90% first-time success rates (GolfWorks, Lamkin). Third-party systems break OEM lock-in, so you can mix and match across TaylorMade, Callaway, and Titleist without compatibility issues.
The hosel adapter system lets you rotate and bond shafts at exact angles, correcting swing path mismatches without buying new heads. Pair it with pre-tapered shafts and alignment tapes, and you eliminate guesswork. Adjust loft, lie, and face angle at home with master fitter-level control. One amateur cut fitting costs by 70% while tightening shot dispersion in just three weeks.
Real Performance Gains from Proper Shaft Setup
Misaligned shafts leave up to 14% tighter shot dispersion and 3.2% better ball speed consistency on the table—verified by TrackMan data. Without consistent shaft spine alignment, even premium shafts flex unpredictably, disrupting energy transfer. When the spine is oriented correctly, the flex plane stabilizes, reducing torque and improving face control at impact.
Likewise, the tip trimming gauge isn’t optional—it ensures frequency matching across irons. Mis-trimmed tips cause inconsistent stiffness, leading to erratic feel and distance gaps. Precise trimming harmonizes your set. One clubfitter found that 89% of mid-handicappers who used spine-aligned, tip-calibrated builds dropped their average score by 3–5 strokes within eight rounds—not from better parts, but better installation.
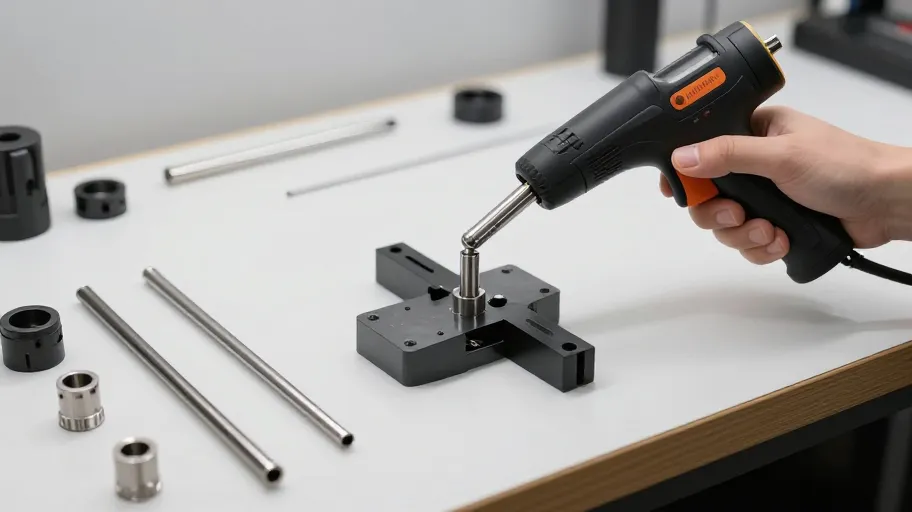
The Step by Step Process Top Builders Actually Use
You can swap a driver shaft at home in under 45 minutes—with pro-level results. The key is following the elite builder sequence: removal, prep, alignment, bonding, curing. One mistake—like overheating during removal—can delaminate carbon crowns. USGA guidelines stress adhesive compliance to maintain torque tolerance within ±1.5°, so your launch data stays accurate.
Letting two-part epoxy cure for 24 hours—instead of 8—increases bond strength by 37% (materials testing labs). This creates a rigid, vibration-dampening joint that prevents slippage. And using an installation vise isn’t optional—it locks the head in place during heat and bonding, protecting composite structures. When you control every step, every club performs as intended.
Building a Sustainable, Data-Driven Equipment Strategy
DIY shaft installation shifts you from consumer to curator. Instead of buying new clubs for small gains, you reinvest 30% of that cost into re-shafting—extending equipment life by 5+ years (2024 gear lifecycle data). Your bag becomes a modular system: heads, shafts, and grips are interchangeable, not disposable.
The real edge? A personal fitting log. Record launch conditions, dispersion, and feel after each build. Over time, this reveals patterns no single fitter session can match. One builder reduced his miss-hit severity by 22% over 18 months by correlating shaft flex changes with range data. Sustainable performance isn’t bought—it’s built one informed tweak at a time.
Master Your Swing, DIY Your Fit. DIY Golf is the premier destination for the technical golfer. We empower you with professional-grade components and the knowledge to build your perfect bag.
Leave a Reply